Simply Said by Jay Sullivan

“Simply Said” is a practical and insightful guide to effective communication by Jay Sullivan. The book offers valuable advice and techniques to help readers enhance their communication skills and convey their ideas with clarity, confidence, and impact.

Sullivan begins by emphasizing the importance of simplicity in communication, highlighting how complex language and jargon often hinder understanding and engagement. He encourages readers to strip away unnecessary complexity and focus on conveying their message in a clear and straightforward manner.

The book covers various aspects of effective communication, including verbal and non-verbal communication, listening skills, and the use of storytelling to connect with audiences. Sullivan provides practical tips on how to structure and deliver compelling presentations, manage difficult conversations, and build rapport with others.

One of the key takeaways from “Simply Said” is the power of active listening. Sullivan emphasizes the significance of genuinely understanding others and actively engaging in conversations. He discusses techniques such as paraphrasing, summarizing, and asking clarifying questions to demonstrate attentive listening and foster effective dialogue.

Additionally, the book delves into the importance of body language, vocal tone, and facial expressions in communication. Sullivan highlights how non-verbal cues can either reinforce or contradict the intended message. He provides practical exercises and suggestions to help readers align their non-verbal communication with their verbal message for more impactful and authentic communication.

Furthermore, “Simply Said” emphasizes the role of storytelling in capturing attention and connecting with audiences. Sullivan explains how well-crafted stories can make complex ideas relatable and memorable. He offers guidance on developing compelling narratives and incorporating them into various communication settings, such as presentations, meetings, and interviews.

Throughout the book, Sullivan combines his expertise as a communication coach with real-life examples and anecdotes to illustrate the concepts he presents. This approach makes the book engaging and relatable, allowing readers to easily apply the lessons to their own personal and professional communication challenges.

In summary, “Simply Said” is a practical and comprehensive guide that equips readers with the necessary tools to enhance their communication skills. Whether you’re a business professional, student, or anyone seeking to improve your ability to connect with others, this book offers valuable insights and actionable strategies to help you communicate with clarity, impact, and simplicity.

Can’t ping some IP addresses in the same subnet – Updated

This is followup from last post about connectivity issue between two computers in same subnet, somehow the arp -s workaround stopped working. I have tried different ways to figure out the root cause, including using tool like tcpdump to sniffer ARP/ICMP request/response, but no luck.

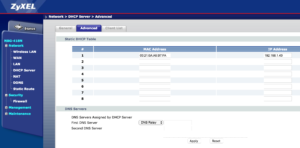
I doubt it’s caused by the wifi router, which model is Zyxel nbg-418n. Eventually I found the workaround to add static DHCP table for one of the machine, and everything works magically.

Static DHCP

Build a real website from scratch Part 1: Setup Dev Environment

Recently I started to learn PHP, and one of the best ways to learn is to practice. So I planned to build a real website using PHP, and write down the steps.

First we need setup the development environment.

CentOS 7:

Download the ISO image and copy it to USB stick.

$ wget http://mirror.vcu.edu/pub/gnu_linux/centos/7/isos/x86_64/CentOS-7-x86_64-Minimal-1511.iso
$ diskutil list
$ diskutil unmountDisk /dev/disk<#id>
$ dd if=CentOS-7-x86_64-Minimal-1511.iso of=/dev/rdisk<#id> bs=1m

After installation, let’s make sure the time is correctly set, otherwise we may see strange issues later.

# sudo yum install -y ntp
# sudo systemctl enable ntpd
# sudo systemctl start ntpd
# date

LAMP

Next we need to setup the Apache web server,  MySQL database and PHP module. There are lots of good tutorials on this topic, for example howtoforge. Bascially we need following steps to install Apache web server.

# sudo yum install httpd
# sudo systemctl start httpd.service
# sudo systemctl enable httpd.service

// if you have firewall setup.
# sudo firewall-cmd --zone=public --add-service=http
# sudo firewall-cmd --zone=public --list-services

Followed by MySQL server and PHP module.

# sudo yum -y install mariadb-server mariadb
# sudo systemctl start mariadb.service
# sudo systemctl enable mariadb.service
# sudo mysql_secure_installation
# sudo yum -y install php
# sudo systemctl restart httpd.service

Add php file and visit it from http://<ip>/info.php to verify installation succeeded.

# sudo echo -e "<?php\n phpinfo(); \n?>" > /var/www/html/info.php

Git

Now let’s install the version control tool git.

# sudo yum -y install git
# git config --global user.name "You Name"
# git config --global core.editor "emacs"

There are different choices for where to host the repository, for example Github or Visual Studio Online,  are both free if you only have one or two repository. For Visual Studio Online, sign in using your Microsoft ID, create your project, get the repository URL. Let’s clone that project to existing folder /var/www.

# sudo chmod -R 777 /var/www
# ln -s /var/www ~/www
# git clone https://{name}.visualstudio.com/_git/idphotoweb temp
# mv temp/.git ~/www/.git
# rm -rf temp

Now let’s check in the info.php file.

# cd ~/www
# git add html/info.php
# git commit -m "first checkin"
# git push origin master

Go back to visual studio online and verify info.php is there, and now we finish the basic development environment setup.

Can’t ping some IP addresses in the same subnet

Recently I have tried to setup Linux machine as dev box, and remote from Mac via SSH. But one strange issue is that I was not able to connect the dev box at all, no matter CentOS 7, CentOS 6.8 and Ubuntu 16.04.

Let me clarify. There are three machines A, B, C connected to wifi. All of them can access external network without any issue. A is Mac, B is the dev box, and C is another test machine. The ping between B and C, A and C works perfectly. But A cannot ping B and B cannot ping A at all. It seems they’re isolated.

$ ping 192.168.1.59
PING 192.168.1.59 (192.168.1.59): 56 data bytes
Request timeout for icmp_seq 0
Request timeout for icmp_seq 1
Request timeout for icmp_seq 2
Request timeout for icmp_seq 3

To diagnostic, first I run “tcpdump icmp” on machine B, and ping from A results nothing, which means the ping request cannot reach to destination. Then check the arp table:

$ arp -a
nbg-418n (192.168.1.1) at cc:5d:4e:48:3d:9e on en0 ifscope [ethernet]
fewang-dev.hsd1.wa.comcast.net (192.168.1.59) at (incomplete) on en0 ifscope [ethernet]

That’s weird as it shows as incomplete, which means we cannot translate the IP address to related physical address.

I don’t know why that could happen, but fixing this can be adding static route with IP address and physical address (MAC address).

$ sudo arp -a -d
$ sudo arp -s 192.168.1.59 00:21:6a:a6:b7:fa

$ ping 192.168.1.59
PING 192.168.1.59 (192.168.1.59): 56 data bytes
64 bytes from 192.168.1.59: icmp_seq=0 ttl=64 time=19.469 ms
64 bytes from 192.168.1.59: icmp_seq=1 ttl=64 time=11.742 ms
64 bytes from 192.168.1.59: icmp_seq=2 ttl=64 time=15.606 ms

Install and configure CentOS 7 on a Raspberry Pi 3

I just bought the Raspberry Pi 3 from Amazon.com CanaKit Raspberry Pi 3 Complete Starter Kit – 32 GB Edition. It seems the Amazon One Day delivery never worked for me, last time my order with one day delivery got cancelled, and this time better it took two days :).

I don’t want to use the default Raspbian OS and instead CentOS 7 is preferred, which is the version I’m using for daily work. The installation is pretty straight forward with help from Google. Basically you need find the correct disk id, download the image, unzip it and copy it the USB MicroSD with your Mac. There is one MicroSD reader included in above Kit.

$ diskutil list
/dev/disk0 (internal, physical):
   ....
/dev/disk1 (internal, virtual):
   ....

/dev/disk2 (external, physical):
   #:                       TYPE NAME                    SIZE       IDENTIFIER
   0:     FDisk_partition_scheme                        *31.4 GB    disk2
   1:             Windows_FAT_16 RECOVERY                1.2 GB     disk2s1
   2:                      Linux                         33.6 MB    disk2s5
$ wget http://buildlogs.centos.org/centos/7/isos/armhfp/CentOS-Userland-7-armv7hl-Minimal-1602-RaspberryPi3.img.xz
$ unxz CentOS-Userland-7-armv7hl-Minimal-1602-RaspberryPi3.img.xz
$ diskutil unmountDisk /dev/disk<#diskid>
$ sudo dd bs=1m if=CentOS-Userland-7-armv7hl-Minimal-1602-RaspberryPi3.img of=/dev/disk<#diskid>

The copy of dd will take a few minutes.

Now insert the SD card to the RespberryPi 3 and boot, then use root/centos to login.

After login we will immediately find that wireless doesn’t work, actually wlan0 device is not recognized by OS.

[root@centos-rpi3 ~]# nmcli d
DEVICE  TYPE      STATE         CONNECTION
eth0    ethernet  connected     eth0
lo      loopback  unmanaged     --

In order to setup the wireless connection, we have to connect to wire connection first and make sure we have internet access. If you want, you can ssh root@<ip> to the Raspberry Pi from you Mac, with the ip address by run ifconfig from the Raspberry Pi.

Now we need first make sure the time is correct by setting up the ntp service, otherwise download later will fail with error complaining certificate error.

# yum install -y ntp
# systemctl enable ntpd
# systemctl start ntpd

Verify the date is correct now:

[root@centos-rpi3 ~]# date
Fri Jun 17 04:20:43 UTC 2016

Then we need download updated firmware from github, update it, then reboot.

# yum -y install git
# git clone https://github.com/RPi-Distro/firmware-nonfree.git
# mv /lib/firmware/brcm{,.org}
# cp -R firmware-nonfree/brcm80211/brcm /lib/firmware/brcm
# curl -L --output /usr/bin/rpi-update https://raw.githubusercontent.com/Hexxeh/rpi-update/master/rpi-update
# chmod +x /usr/bin/rpi-update
# rpi-update
# reboot

After reboot finished, the wlan0 interface will be available.

[root@centos-rpi3 ~]# nmcli d
DEVICE  TYPE      STATE         CONNECTION
eth0    ethernet  connected     eth0
wlan0   wifi      disconnected  --
lo      loopback  unmanaged     --

Now find the SSID of your wifi connection point, and connect to it.

[root@centos-rpi3 ~]# nmcli d wifi
*  SSID               MODE   CHAN  RATE       SIGNAL  BARS  SECURITY
   kobuk              Infra  5     54 Mbit/s  60      ▂▄▆_  WPA2
   --                 Infra  1     54 Mbit/s  20      ▂___  WPA1 WPA2
   .....

[root@centos-rpi3 ~]# nmcli d wifi connect <your_uuid> password <your_pwd>
[root@centos-rpi3 ~]# nmcli d
DEVICE  TYPE      STATE      CONNECTION 
eth0    ethernet  connected  eth0       
wlan0   wifi      connected  <your_uuid>    
lo      loopback  unmanaged  --

Now confirm the wifi connection state and with the ip address we can remove the wire network connection.

root@centos-rpi3 ~]# nmcli d show wlan0
GENERAL.DEVICE:                         wlan0
GENERAL.TYPE:                           wifi
GENERAL.HWADDR:                         B8:27:EB:6F:DF:97
GENERAL.MTU:                            0
GENERAL.STATE:                          100 (connected)
GENERAL.CONNECTION:                     ....
GENERAL.CON-PATH:                       /org/freedesktop/NetworkManager/ActiveConnection/2
IP4.ADDRESS[1]:                         192.168.1.56/24
IP4.GATEWAY:                            192.168.1.1
IP4.DNS[1]:                             192.168.1.1
IP4.DOMAIN[1]:                          hsd1.wa.comcast.net
IP6.ADDRESS[1]:                         ....
IP6.GATEWAY:


Visualizing Word2Vec Embeddings using t-SNE

t-distributed stochastic neighbor embedding(t-SNE) is a machine learning algorithm for dimensionality reduction developed by Laurens van der Maaten and Geoffrey Hinton. It is a nonlinear dimensionality reduction technique that is particularly well suited for embedding high-dimensional data into a space of two or three dimensions, which can then be visualized in a scatter plot. Specifically, it models each high-dimensional object by a two- or three-dimensional point in such a way that similar objects are modeled by nearby points and dissimilar objects are modeled by distant points.

Word2vec is a group of related models that are used to produce word embeddings. These models are shallow, two-layer neural networks that are trained to reconstruct linguistic contexts of words. Word2vec takes as its input a large corpus of text and produces a vector space, typically of several hundred dimensions, with each unique word in the corpus being assigned a corresponding vector in the space, it was created by a team of researchers led by Tomas Mikolov at Google.

This tutorial shows how to use the t-SNE to visualize the words embedding from Word2Vec, it should be similar to apply it to other kinds of embedding tasks. By the end of this tutorial we’ll get plot looking like following digram, from which we can see  similar words are close to each other, similarity can be meaning, location and so on.

Visualization word2vec using t-SNE


Prerequisite

Python version of the t-SNE is used, and it requires matplotlib.

Training

First download the word2vec and build the source code.

wget https://storage.googleapis.com/google-code-archive-source/v2/code.google.com/word2vec/source-archive.zip
unzip source-archive.zip
cd word2vec/trunk
make

If there is error complaining about “‘malloc.h’ file not found”, then go the related file and replace malloc.h to stdlib.h.

Then we are going to train use text corpus from Matt Mahoney.

wget http://mattmahoney.net/dc/text8.zip -O text8.gz
gzip -d text8.gz -f
./word2vec -train text8 -output vectors.txt -cbow 1 -size 200 -window 8 -negative 25 -hs 0 -sample 1e-4 -threads 20 -binary 0 -iter 15

Now we have the embeddings file named vectors.txt.

Visualization

Let’s download the tsne.py, and two helper scripts I have written.

wget https://raw.githubusercontent.com/kingwind/tsneplot/master/tsnePlot.py
wget https://raw.githubusercontent.com/kingwind/tsneplot/master/prepareForTsNE.py
wget https://raw.githubusercontent.com/kingwind/tsneplot/master/tsne.py

Usually we don’t want to plot all the embeddings at same time as it’s too noisy. For this Lab Notes suppose we are only interesting in the words from the analogy test used in word2vec.

wget https://raw.githubusercontent.com/dav/word2vec/master/data/questions-words.txt

Next step is to prepare the input for visualization using the prepareForTsNe.py. The output label_w2v.txt contains the word to plot, and the output embed_w2v.txt contains the related vectors.

python prepareForTsNE.py -e vectors.txt -s questions-words.txt -l label_w2v.txt -x embed_w2v.txt

There are maybe some warning about some words not found, which is OK.

Now it’s ready to visualize the results using t-SNE. 200 is the dimension of the vector and p is perplexity usually ranged from 20 to 50.

python tsnePlot.py -l label_w2v.txt -v embed_w2v.txt -d 200 -p 50

Please note that it’s possible that every time we run the t-SNE, we may get a slightly difference plot. That’s expected and explanation can be found on FAQ from t-SNE.